


Our Blogs
How to Build an Outboard Motor Stand: A DIY Guide

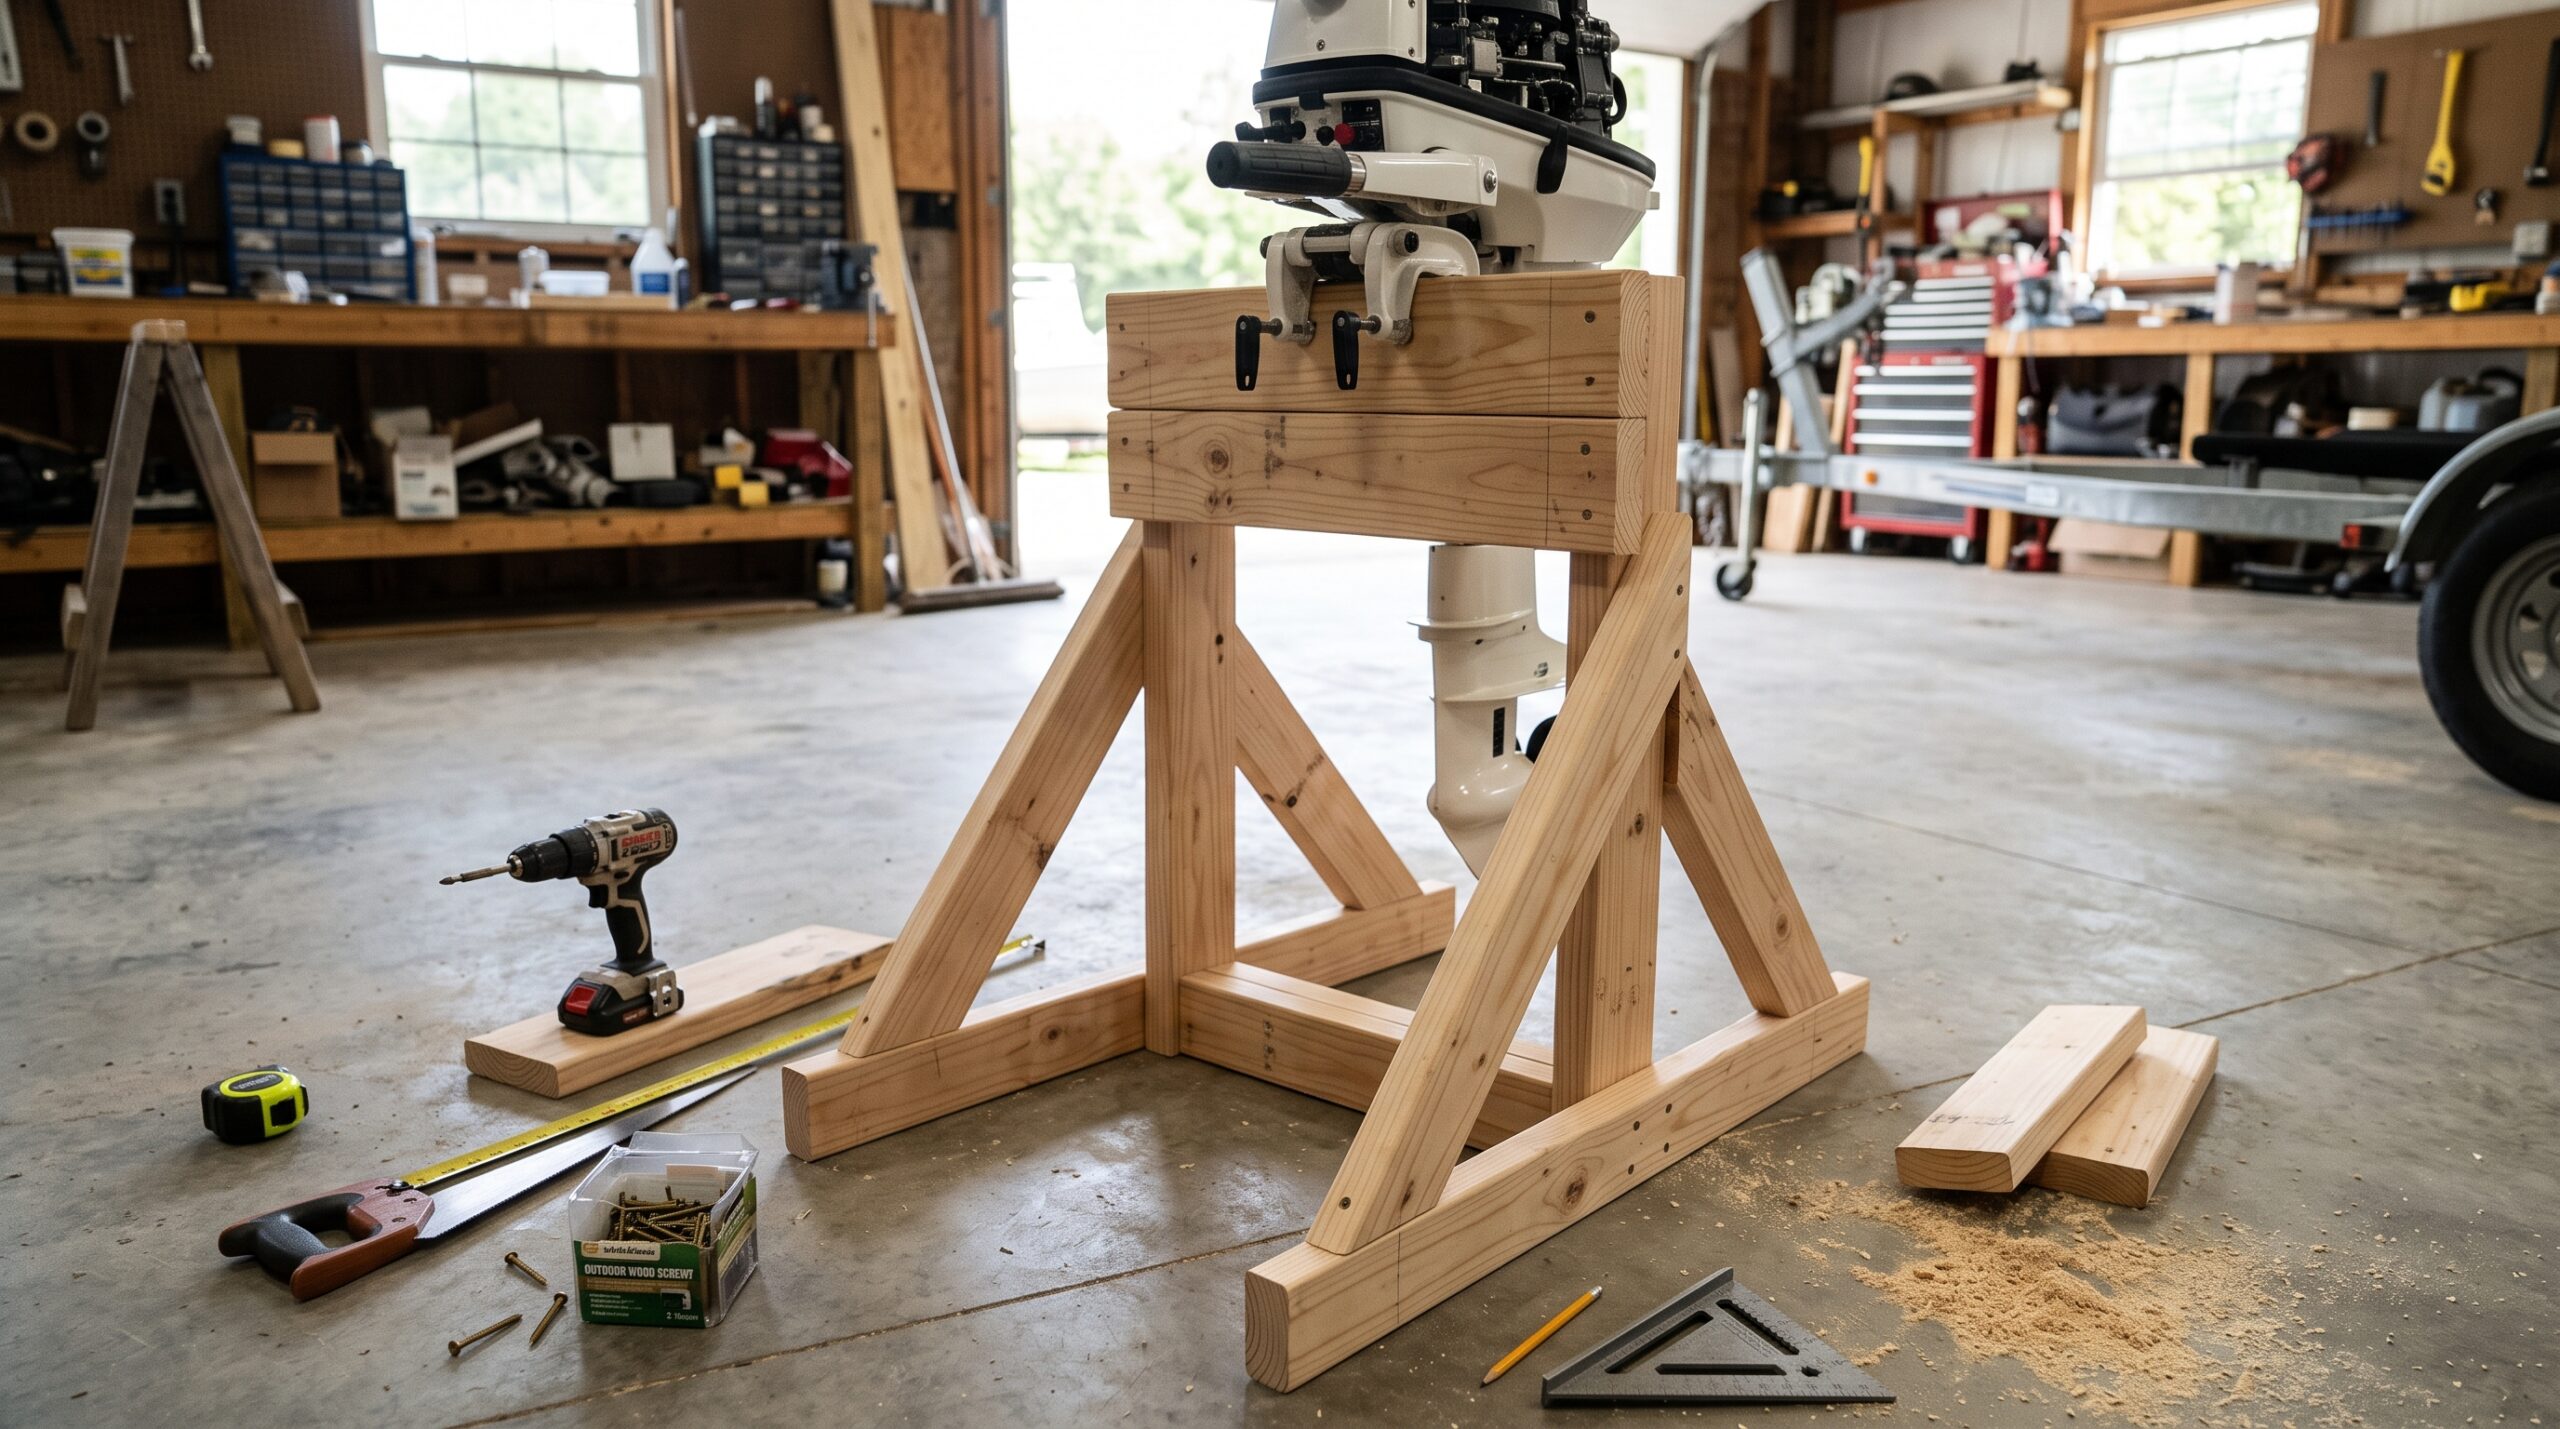
If you are learning how to build an outboard motor stand, start by checking your engine’s weight, mounting points, and overall size. These details will help you choose a suitable design. A strong base, a well-supported mounting board, and diagonal braces are essential for a stable stand.
A wooden stand made from sound, properly sized lumber can work well for many small and medium outboard motors. A metal frame may be a better choice for heavier engines or frequent workshop use. However, the right material depends on the engine, construction quality, and intended load.
This guide explains the materials you need, how to plan the frame, how to assemble the main parts, and how to check the finished stand before use. It also covers costs, maintenance, common mistakes, and answers to frequently asked questions.
Important safety note: A homemade stand is only as safe as its design and construction. Do not assume that a stand can hold a particular engine weight without checking the complete frame, mounting board, fasteners, and base. For heavy engines, use a commercially rated stand or have a qualified fabricator design and verify the structure.
What Is an Outboard Motor Stand?
An outboard motor stand is a support frame designed to hold an outboard boat engine upright when it is off the boat. Most designs have a wide base, a vertical frame, and a strong mounting board that supports the engine’s mounting brackets.
Some stands are fixed in place. Others have wheels so the engine can be moved around a garage or workshop. A good design keeps the motor balanced and reduces the risk of tipping, slipping, or damaging the engine.
Main Uses of an Outboard Motor Stand
Boat owners use motor stands for several reasons.
-
Storage: Keep an engine upright in a garage, shed, or workshop.
-
Maintenance: Make it easier to inspect accessible engine parts.
-
Repairs: Provide a stable support for suitable workshop tasks.
-
Transport around a workshop: Move an engine short distances with a properly rated wheeled stand.
-
Organization: Keep the motor off the floor and reduce clutter.
For example, if you remove a small outboard motor from a fishing boat during the off-season, a stand can provide a dedicated storage location. You can also access the mounting area more easily when preparing the engine for service.
A stand does not replace a proper engine hoist, lifting device, or service fixture. Use the equipment specified for your motor whenever a job requires lifting or special support.
Benefits of Building Your Own Motor Stand
A DIY stand lets you choose the dimensions, mounting height, and base layout to suit your workspace. You may also be able to use suitable materials you already own.
Other benefits include:
-
A design that fits your available storage space.
-
A mounting board sized for your engine’s brackets.
-
A choice between fixed feet and rated locking casters.
-
Easier inspection of the stand’s construction and fasteners.
-
The ability to repair or replace individual parts.
However, building a stand yourself also means taking responsibility for its strength and stability. A low price is not worth the risk of a damaged engine or a falling load.
DIY Stand vs. Buying a Ready-Made Stand
Both options can be useful, but they suit different needs.
| Feature | DIY stand | Ready-made stand |
|---|---|---|
| Initial cost | May be lower | Depends on model |
| Custom dimensions | Easy to plan | Limited by design |
| Assembly | Requires building skills | Usually simpler |
| Load rating | Must be verified | Check the manufacturer’s rating |
| Wheels | Optional | Available on some models |
| Heavy engines | Requires careful engineering | Often preferable if properly rated |
A homemade wooden stand may be practical for a lighter engine and occasional storage. For a heavy motor, a stand with a documented load rating is often the safer choice.
Tools and Materials Needed to Build an Outboard Motor Stand
Before starting, prepare your materials and check that each part suits the engine you intend to support. Do not choose lumber, tubing, or fasteners based only on appearance.
The following list is a starting point for planning a stand. Final dimensions and material sizes must be based on the engine’s weight, mounting requirements, and the strength of the completed structure.
Choosing the Right Wood or Metal
Wood and metal are the two most common materials for a homemade outboard motor stand.
Wood: Sound structural lumber is easy to cut and assemble with common workshop tools. It is a practical option for many small-engine stands. Avoid split, warped, rotten, or badly knotted pieces in important load-bearing areas.
Steel: Steel tubing can provide a strong, rigid frame when correctly sized and joined. It requires suitable cutting, drilling, welding, or bolted connections, depending on the design.
Aluminum: Aluminum is lighter than steel, but its strength depends on the alloy, shape, wall thickness, and joint design. It is not automatically a safe substitute for steel tubing.
For a first project, a wooden frame may be easier to build. For a heavy motor, select a design with a verified load rating rather than relying on general material comparisons.
Essential Tools for the Project
Your tool list will depend on the chosen design.
For a wooden stand, you may need:
-
Measuring tape and pencil
-
Carpenter’s square
-
Saw suitable for the lumber
-
Drill and suitable drill bits
-
Wrenches or socket set
-
Clamps
-
Sandpaper
-
Safety glasses and hearing protection
A metal stand may require a metal-cutting saw, files, a drill, clamps, and suitable metalworking equipment. Welding should only be done by someone with the correct training and equipment.
Measure twice before cutting. Keep your workpiece secured, and follow the safety instructions for every tool.
Bolts, Screws, Brackets, and Other Hardware
The connections between the frame parts are just as important as the materials themselves.
Depending on the design, you may need:
-
Structural screws approved for the intended wood connections
-
Through-bolts, washers, and locking nuts
-
Steel angle brackets or purpose-designed connectors
-
Motor-mounting bolts or suitable clamping hardware
-
Protective caps for exposed metal edges
-
Corrosion-resistant hardware where moisture is present
Do not use ordinary drywall screws for load-bearing joints. They are not designed for this purpose.
Choose fasteners based on the forces they must resist, the material thickness, and the manufacturer’s installation guidance. The motor’s own mounting hardware must also be suitable for its brackets and mounting board.
Choosing Suitable Casters or Wheels
Wheels can make a stand easier to move, but they also introduce another possible point of failure.
If you plan to add casters, check the following:
-
Each caster’s rated load.
-
The combined capacity of the casters under realistic loading conditions.
-
The strength of the caster plates and their attachments.
-
Whether the wheels can lock securely.
-
Whether the wheels are suitable for the workshop floor.
-
Whether the added height affects stability.
Do not assume that four casters rated at the same load can always support four times that load. Uneven floors and weight distribution can cause some wheels to carry more weight than others.
For a stand used to hold a heavy engine, fixed feet may be preferable. If the stand needs wheels, use a design that accounts for them from the beginning.
How to Build an Outboard Motor Stand Step by Step
The steps below explain the general construction process. They are not a universal, load-rated blueprint. Lumber sizes, frame dimensions, joint details, and fasteners must be selected for the specific engine and stand design.
If you are researching how to build an outboard motor stand, the most important principle is to plan the complete load path before cutting material. The engine’s weight must travel safely through the mounting board, upright frame, base, and floor.
Step 1: Choose the Right Stand Design
Start by deciding how you will use the stand.
Ask yourself:
-
Will it hold the engine only during storage?
-
Will you need to move it around a workshop?
-
How heavy is the engine?
-
Does the motor need a particular mounting height?
-
Will the stand be used in a damp or salty environment?
-
Do you have the tools and skills to build the frame?
A basic fixed wooden stand may suit a small outboard. A heavier motor may require a reinforced metal frame and a commercially rated design.
Sketch the base, uprights, mounting board, and braces. Mark where each joint will be located. This helps you spot weak areas before construction begins.
Step 2: Measure Your Outboard Motor
Measure the engine before deciding on the final dimensions.
Record:
-
The overall motor height.
-
The width across the mounting brackets.
-
The distance between mounting holes, if applicable.
-
The position of the motor’s center of gravity, using manufacturer information where available.
-
The engine’s weight, including any accessories that will remain attached.
-
The clearance needed for the lower unit, steering components, and other parts.
Also check the motor manufacturer’s storage and mounting instructions.
The mounting board must fit the engine’s mounting system without forcing the brackets into an unsuitable position. Do not drill holes until you have confirmed the layout.
Step 3: Cut the Base and Support Pieces
Once the design and dimensions are confirmed, prepare the base members, uprights, braces, and mounting-board support pieces.
For a wooden design, inspect each piece before cutting. Reject damaged lumber for important structural parts.
Use a square to mark straight cuts. Keep the saw blade away from your hands, secure the material, and wear appropriate protective equipment.
Label the cut pieces so you can identify their positions during assembly. Check the measurements again before drilling or fastening anything.
For a metal design, remove sharp edges after cutting. Ensure that the pieces fit together as intended and that the final joints can be made using the selected connection method.
Step 4: Assemble the Base Frame
The base provides the stand’s footprint and helps resist tipping.
Lay out the base pieces on a flat surface. Check that the frame is square and that opposite sides align. Assemble the joints with the connectors and fasteners specified in your design.
The base should extend far enough to support the engine’s weight without making the stand unstable. Its dimensions depend on the motor, frame height, and mounting position.
Avoid building a tall, narrow base simply to save floor space. A wider, properly designed footprint can improve resistance to tipping.
Before continuing, check for loose joints, gaps, and uneven contact with the floor.
Step 5: Build the Vertical Support Frame
The vertical frame holds the mounting board at the required height.
Position the uprights according to your design. Check that they are aligned and securely connected to the base. Use suitable connectors or engineered joints rather than relying on a few small screws.
The uprights must resist both the engine’s downward load and the forces that can occur if the engine shifts slightly.
Keep the mounting area aligned with the base. If the frame leans or twists, the motor may become unstable even when the base looks strong.
Use a level or square to check alignment before fully tightening the connections.
Step 6: Install the Motor Mounting Board
The mounting board supports the outboard’s mounting brackets. It is one of the most important parts of the stand.
For a wooden stand, choose sound structural material with adequate thickness and width for the engine’s brackets and fasteners. The required dimensions depend on the engine’s weight, mounting arrangement, and the distance between the supports.
Place the board so that the load transfers into the uprights and braces. Avoid a design where the board relies on unsupported ends or weak edge fasteners.
Mark the mounting holes carefully, then confirm that they match the engine’s mounting system. Drill only after checking the hole spacing and edge distances.
Do not assume that a thick board alone makes the stand safe. The board’s support, fasteners, and surrounding frame must all work together.
Step 7: Add Braces for Extra Stability
Diagonal braces help reduce side-to-side movement and twisting.
A frame without braces may flex when a motor is mounted or moved. Braces connect different parts of the frame to create a more rigid structure.
Fit braces between the uprights and the base or other suitable frame members, following the planned design. Secure each end with appropriate connections.
Check the stand from the front, side, and rear. Look for movement that could allow the upper frame to sway.
For heavy engines, bracing should be part of a verified structural design, not an improvised fix after the frame has been built.
Step 8: Install Wheels or Casters, If Needed
If you want a mobile stand, install the casters at the positions specified in the design.
Check that the caster plates sit flat and that the fasteners suit the base material. Confirm that the wheels can turn without hitting braces or other parts of the frame.
Locking casters can help prevent unwanted movement, but locks are not a substitute for a stable base. Do not mount or remove an engine while the stand is rolling or shifting.
If the stand will remain in one place, fixed feet may be simpler and more reliable.
Step 9: Check All Fasteners and Connections
Before mounting an engine, inspect the complete stand.
Check that:
-
The base sits flat.
-
The frame is aligned and does not visibly twist.
-
All bolts, nuts, and screws are secure.
-
The mounting board has no cracks or splits.
-
Braces are firmly attached.
-
Wheels, if fitted, lock correctly.
-
No sharp edges or loose parts remain.
Do not use an actual engine as the first test of an unverified stand. An informal test cannot establish a safe load rating. For a heavy motor, obtain a design review or use a properly rated commercial stand.
Once the stand has been verified for its intended load, follow the manufacturer’s or designer’s instructions for use.
How to Choose the Right Size for an Outboard Motor Stand
The right size depends on more than the engine’s height. The base width, mounting-board dimensions, brace positions, and load rating all affect safety.
Measuring the Motor’s Width and Height
Start with the manufacturer’s specifications and confirm the physical dimensions of your motor.
Measure across the mounting brackets and identify the correct mounting height. Make sure the lower unit has adequate clearance from the floor.
A stand that is too low may leave the lower unit resting on the floor. A stand that is too high can raise the center of gravity and make the assembly less stable.
Allow enough space to work around the engine without making the frame unnecessarily tall.
Selecting the Correct Mounting Board Thickness
There is no single mounting-board thickness that works for every outboard.
A suitable board must resist bending, splitting, and damage around the mounting holes. Its required thickness depends on the material, span between supports, engine weight, fastener arrangement, and forces applied during use.
Use a board and support layout specified by a reliable design. Do not copy dimensions from a photograph without knowing the engine weight and construction details.
Adjusting the Stand for Different Motor Sizes
Different outboards may need different mounting arrangements.
A small portable motor may fit a compact stand. A large engine may require a wider base, stronger frame members, a reinforced mounting system, and mechanical lifting equipment.
If you want one stand for several motors, design it for the heaviest and most demanding intended use. Any adjustable parts must lock securely and must not weaken the frame.
Avoid adding improvised extensions or drilling extra holes into a finished stand without checking their effect on strength.
Checking Weight Capacity and Stability
Find the engine’s actual weight in the manufacturer’s specifications. Include accessories and other components that will remain attached.
Then verify the complete stand’s capacity. This includes the mounting board, fasteners, joints, uprights, base, and any wheels.
A stand’s capacity cannot be calculated safely from the lumber size alone. The center of gravity and the way the motor is mounted also affect stability.
If the load rating is unknown, treat the capacity as unknown. Do not use guesswork to justify storing a heavy engine on a homemade frame.
How to Build a Wooden Outboard Motor Stand
Wood is popular for DIY projects because it is easy to work with and widely available. A well-designed wooden frame can serve as a useful support for an appropriately sized outboard motor.
Advantages of Using Wood
Wood offers several practical benefits:
-
It can be cut with common woodworking tools.
-
Parts are easy to replace when damaged.
-
Assembly does not require welding.
-
Suitable lumber is available at many hardware stores.
-
The frame can be customized for a particular motor.
However, wood can absorb moisture, split, or decay. Its strength also varies with species, grade, defects, and grain direction.
Recommended Frame Design
A typical wooden stand has four main elements:
-
A wide base frame.
-
Two or more upright supports.
-
A mounting board secured to the uprights.
-
Diagonal braces to reduce movement.
The exact number and arrangement of parts depend on the design. The engine’s weight must transfer through the mounting board into the frame and then into the floor.
Keep the base level and make sure the uprights are well supported. Avoid relying on nails or small screws alone for major load-bearing connections.
If you are deciding how to build an outboard motor stand from lumber, prioritize sound materials and secure joints over a complicated design.
How to Protect Wood From Moisture
A wooden stand may be exposed to damp floors, condensation, or water brought in with a boat engine.
To reduce moisture damage:
-
Use sound, dry lumber.
-
Seal exposed wood surfaces with a suitable protective coating.
-
Pay attention to cut ends and drilled holes.
-
Keep the stand off standing water.
-
Allow the wood to dry before storing it in a closed space.
-
Check regularly for swelling, cracks, and decay.
Let any paint, sealant, or other finish cure according to the product instructions before mounting the motor.
A protective finish can slow moisture damage, but it does not make weak or damaged wood safe for structural use.
Common Wooden Stand Construction Mistakes
Common mistakes include choosing lumber with major defects, leaving the frame unbraced, and using unsuitable fasteners.
Another mistake is placing the mounting board too far from its supports. This can increase bending forces and stress around the mounting holes.
Avoid building from an unverified plan simply because it looks sturdy in a picture. Check that the design suits your particular engine and that every connection has adequate support.
How to Build a Metal Outboard Motor Stand
Metal can be useful for a workshop stand that needs greater durability or frequent use. However, a metal frame still needs a suitable design, reliable joints, and protection against corrosion.
Choosing Steel or Aluminum
Steel is widely used for structural frames because it is available in many shapes and sizes. Properly selected steel tubing can provide a rigid support structure.
Aluminum is lighter, which may make the stand easier to move. However, aluminum grades vary in strength, and welding them requires appropriate methods and skills.
Do not choose tubing based on its outside dimensions alone. Wall thickness, alloy or grade, unsupported length, joint details, and loading all matter.
Frame Design and Reinforcement
A metal stand often uses a rectangular base, upright tubing, a mounting plate or board, and diagonal braces.
The design must account for bending, twisting, and the forces produced when the engine is installed or removed.
Connections may be welded or bolted, depending on the design. Welds must be made correctly, while bolted joints need suitable hardware, edge distances, and secure attachment points.
For a heavy outboard, have the frame designed or checked by a qualified fabricator or engineer. A neat weld does not automatically mean a strong joint.
Corrosion Protection for Marine Environments
Water and salt can damage metal, especially at joints and damaged coating areas.
To protect the frame:
-
Use a coating suitable for the metal and environment.
-
Prepare surfaces as required by the coating manufacturer.
-
Inspect welds, corners, and fastener holes.
-
Repair damaged paint or protective finishes.
-
Avoid leaving the stand in standing water.
-
Check for rust, pitting, and loose connections.
Use compatible materials and fasteners. Dissimilar metals in a wet environment can promote galvanic corrosion, especially where salt is present.
When a Metal Stand Is the Better Choice
A metal stand may be preferable when the engine is heavy, the stand will be used often, or the workshop needs a durable mobile frame.
It can also be useful when a design requires a particular mounting arrangement that is easier to fabricate from steel.
Still, material alone does not determine safety. A properly designed wooden stand may be suitable for one engine, while an undersized metal stand may be unsafe for another.
How to Mount an Outboard Motor on the Stand
Mounting the engine is a critical stage. The stand must be verified for the motor’s weight before you begin.
Positioning the Motor Correctly
Place the stand on a flat, stable surface. Confirm that the mounting board and frame are correctly aligned.
Position the engine according to its manufacturer’s mounting instructions. Ensure that the lower unit has adequate clearance and that the motor does not pull the stand to one side.
Use an appropriate lifting device or the method specified by the manufacturer. Do not attempt to lift a heavy engine alone.
Securing the Motor to the Mounting Board
Use the motor’s intended mounting points and suitable hardware.
Follow the engine manufacturer’s instructions for clamp placement, bolts, washers, and tightening requirements. Do not rely on friction alone if the motor’s mounting system requires bolts or other positive restraints.
Check that the mounting board is not cracked, splitting, or bending. If the engine cannot be secured as intended, stop and correct the design before use.
Keeping the Stand Balanced
The engine should sit in a position that keeps its weight within the support footprint.
If the motor is mounted too far to one side, the stand may tip or twist. A high center of gravity can also reduce stability.
Keep heavy accessories in their intended positions, and do not hang tools or other loads from the frame unless the design allows them.
Preventing the Motor From Slipping or Tipping
Use the proper mounting hardware and follow the engine manufacturer’s directions.
Never use loose rope, improvised hooks, or weak straps as a substitute for the motor’s intended mounting system. If additional restraints are required, they must be suitable for the load and attached to appropriate points.
Before moving a secured engine, check the stand’s stability and ensure that any wheels are unlocked only when you are ready to move it. Move slowly over a suitable floor and avoid slopes or uneven surfaces.
Safety Tips for Using an Outboard Motor Stand
A well-built stand still needs regular inspection and careful use.
Inspecting the Stand Before Each Use
Look for loose fasteners, cracks, bent parts, damaged welds, and signs of corrosion or decay.
Check the mounting board and the area around the engine’s mounting points. Confirm that the base sits evenly on the floor.
If you find a defect, remove the engine using suitable lifting equipment before repairing the stand. Never work under a suspended engine or attempt to tighten a major connection while the structure is unstable.
Avoiding Overloading
Do not use a stand beyond its verified load rating.
Remember that the total load may include the engine, attached accessories, and any other items the design is intended to support.
Avoid pushing down on the frame, hanging heavy equipment from it, or using it as a workbench unless those loads have been included in the design.
Locking Wheels Before Mounting or Removing the Motor
Lock the casters before loading or unloading the stand. Check that the locks engage properly and that the wheels cannot roll unexpectedly.
If the floor slopes or is uneven, move the stand to a more suitable location. Wheel locks do not make an unstable stand safe.
Using Proper Lifting Equipment for Heavy Motors
Outboard motors can be awkward to lift because their weight is not always easy to balance by hand.
Use a suitable engine hoist, lifting device, or other equipment specified by the manufacturer. Check that the lifting equipment and attachment points are rated for the load.
Keep people clear of the lifting path. Never try to catch a falling engine or steady a heavy motor by placing your hands beneath it.
Storing the Stand on a Flat, Stable Surface
Use the stand on a firm, level floor. Avoid soft ground, loose gravel, steep slopes, and surfaces that could shift under load.
Leave enough space around the stand so that people cannot accidentally bump the motor. Keep children, pets, and unrelated workshop activity away from the loaded stand.
Common Mistakes to Avoid When Building an Outboard Motor Stand
Careful planning can prevent many problems before they occur.
Using Weak or Undersized Materials
Material that looks strong may still be unsuitable for the load. Thin boards, damaged lumber, undersized tubing, and poor-quality connectors can fail under stress.
Choose materials according to the design and verify that they can support the expected loads.
Skipping Cross Braces
A frame may look rigid when empty but move once a motor is mounted.
Diagonal bracing helps resist twisting and side-to-side movement. Include it where the design requires it, and secure both ends properly.
Choosing the Wrong Mounting Height
A mounting board that is too high may increase the risk of tipping. A board that is too low may leave the lower unit touching the floor.
Measure the motor and plan its position before building the frame.
Using Poor-Quality Fasteners
Incorrect screws, loose bolts, and unsuitable brackets can weaken otherwise sound construction.
Use hardware intended for structural connections. Tighten fasteners according to the applicable instructions, and inspect them regularly.
Ignoring Weight Distribution
A stand must support the motor’s weight without placing excessive load on one side or outside the base.
Consider the engine’s center of gravity and how the motor will be mounted. Do not add accessories or modify the stand without checking their effect on balance and strength.
How Much Does It Cost to Build an Outboard Motor Stand?
The total cost depends on your location, material choice, engine size, hardware, and whether you already own the tools.
The figures below are illustrative planning ranges in US dollars, not current supplier quotations. Actual prices may vary widely, particularly in Bangladesh and other markets where imported hardware or metalworking services can cost more.
Estimated Cost of a Wooden Stand
A basic wooden project might involve:
| Item | Illustrative cost |
|---|---|
| Structural lumber | $20–$50 |
| Screws, bolts, and brackets | $10–$25 |
| Protective finish | $5–$15 |
| Optional suitable casters | $15–$40 |
| Estimated total | $35–$130 |
This range assumes access to basic tools and does not include paid labor. A larger or more heavily reinforced design may cost more.
Estimated Cost of a Metal Stand
A metal project may require tubing, plates, fasteners, coating, and fabrication.
| Item | Illustrative cost |
|---|---|
| Steel tubing or other suitable metal | $30–$90 |
| Fasteners and mounting hardware | $10–$30 |
| Coating and surface preparation | $10–$25 |
| Optional suitable casters | $15–$40 |
| Estimated total | $50–$185 |
Welding, cutting, delivery, and professional fabrication can increase the total significantly. Aluminum may have a different cost and requires suitable design and fabrication methods.
Factors That Affect the Total Cost
Several factors influence the final price:
-
Engine weight and size.
-
Type and grade of material.
-
Amount of reinforcement required.
-
Quality and load rating of casters.
-
Type of fasteners and connectors.
-
Tool purchases or rental.
-
Labor and fabrication costs.
-
Protective coatings and replacement parts.
A heavy engine may require a professionally designed stand, which can cost more than a basic DIY project.
Tips for Saving Money on a DIY Project
You can reduce costs without sacrificing safety.
-
Use suitable lumber or metal you already own.
-
Compare prices from several local suppliers.
-
Choose a simple design that meets the actual requirements.
-
Avoid buying unnecessary decorative parts.
-
Reuse tools rather than purchasing duplicates.
-
Calculate the full cost before deciding between DIY and a ready-made stand.
Do not save money by removing necessary braces, choosing weaker fasteners, or using unverified materials. A lower initial cost is not a good deal if the stand cannot safely support the motor.
How to Maintain Your Outboard Motor Stand
Regular maintenance helps you spot problems before they become serious. Inspect the stand even if the motor remains in storage for several months.
Checking Screws, Bolts, and Joints
Check all visible connections at regular intervals and before each use.
Look for loose nuts, missing washers, cracked wood, bent brackets, and movement between connected parts. Tighten fasteners according to the design instructions.
Do not simply tighten a damaged joint and continue using the stand. If the material around a bolt hole has split or become weak, repair or replace the affected part before loading the engine again.
Preventing Rust and Wood Damage
Keep the stand clean and dry. Remove dirt and moisture, and inspect the frame for rust or wood decay.
Touch up damaged protective coatings as needed. Replace lumber that has become soft, rotten, or badly split. For metal frames, inspect welds and joints for corrosion that could affect their strength.
Maintaining Wheels and Casters
If the stand has wheels, check that they roll smoothly and lock securely.
Remove dirt and debris from the wheels. Lubricate moving parts when the caster manufacturer recommends it, and replace damaged wheels or loose mounting hardware.
A caster that no longer locks properly should not be trusted to hold a loaded stand in place.
Knowing When to Repair or Replace the Stand
Stop using the stand if you notice serious cracks, bent structural members, failed joints, damaged mounting holes, or signs of instability.
Minor surface damage may be repairable, but structural damage requires a proper assessment. Do not use extra screws, random brackets, or improvised supports as a substitute for a sound repair.
If the stand’s capacity or construction cannot be verified, use a properly rated replacement.
FAQ
What Is the Best Material for an Outboard Motor Stand?
The best material depends on the engine and intended use. Sound structural wood is practical for many small-engine stands. Steel can be suitable for heavier engines when the frame and joints are properly designed. Aluminum offers lower weight but requires careful material selection.
For a heavy motor, a verified load-rated stand is generally the safer choice.
Can You Build an Outboard Motor Stand From 2×4 Lumber?
Yes, 2×4 lumber can be used in some stand designs, particularly for smaller outboards. However, the lumber size alone does not establish a safe load capacity.
The lumber grade, condition, frame layout, brace placement, fasteners, and engine weight all matter. Use a design that has been checked for your intended load rather than copying a general plan.
How Tall Should an Outboard Motor Stand Be?
The stand should be tall enough to support the motor at the required mounting position while keeping the lower unit clear of the floor.
Measure your engine before choosing the height. Consider the mounting brackets, lower-unit length, center of gravity, and available workspace.
Avoid unnecessary height because raising the engine can increase the risk of tipping.
Can an Outboard Motor Stand Have Wheels?
Yes. A stand can have wheels if the casters, attachments, and base are suitable for the total load.
Choose casters with appropriate ratings and secure locking mechanisms. Lock the wheels before mounting or removing the engine, and move the stand only over a suitable, level surface.
For a heavy motor, a fixed stand may be more appropriate.
How Much Weight Can a DIY Outboard Motor Stand Hold?
There is no single weight limit for all homemade stands.
Capacity depends on the materials, dimensions, connections, mounting board, base, and weight distribution. The ratings of any casters must also be considered.
Do not estimate capacity from appearance or material size alone. If the stand has no verified rating, do not assume it is safe for a particular engine.
Is a Wooden Outboard Motor Stand Strong Enough for a Heavy Engine?
It may be possible to design a wooden stand for a substantial load, but doing so requires proper structural calculations and suitable construction.
For a heavy outboard, do not rely on an ordinary DIY design without professional verification. A rated commercial stand or a stand designed by a qualified professional is a more reliable option.
Can You Store an Outboard Motor on a DIY Stand Long-Term?
Yes, if the stand is designed and verified for the motor’s weight and storage position. Keep it on a flat, stable surface in a suitable environment.
Follow the engine manufacturer’s storage instructions, inspect the mounting hardware, and check the stand regularly for corrosion, wood damage, or loose connections.
Long-term storage does not remove the need for periodic inspection.
Conclusion
Learning how to build an outboard motor stand starts with choosing a suitable design, measuring the engine, and selecting strong materials. The main construction stages are assembling the base, securing the upright frame, installing the mounting board, adding braces, and checking every connection.
Wood can work well for some smaller engines, while metal may suit other designs. In either case, the complete stand must support the engine’s weight and resist tipping, twisting, and movement.
Before using your finished stand, verify its load capacity, inspect the fasteners, and confirm that the motor is securely mounted. Use appropriate lifting equipment for heavy engines.
The safest outboard motor stand is one that fits your engine, has a stable base, uses sound materials, and has a verified capacity for its intended load.